Wednesday, September 5, 2012

Masonry sealer: To Seal or Not To Seal?


Gbenga asked us an interesting remodeling question:  
"Does an exterior sealer on a brownstone have any negative effects on the home?"
Masonry sealer can be extremely beneficial to extending the life of most man-made and quarried stone. You didn't specify the application, but "brownstone" is typically a form of sandstone. Sandstone is a quarried stone that tends to be particularly porous and can deteriorate over time when exposed to inclement weather conditions. Sealing any porous stone can only benefit its lifespan.

The only negative (or perceived negative) that we have dealt with in a masonry sealer is it can alter the physical appearance of the stone itself. Much like the difference between a piece of unfinished wood and varnished wood, sealer can darken and change the sheen of a particular material so you need to keep that in mind when choosing a sealer. Check out the image below to see what I mean:

If you have the option, test the sealer on an inconspicuous area of the stone and let it dry so that you can judge whether or not you like the finish much the same way you would with testing a paint color before painting a room. The difference being you can always re-paint a room, removing sealer isn't as simple.

I would also offer that before you apply any sealer, make sure the surface is properly prepared. In an exterior application I recommend pressure washing the surface to help remove any residues or staining. In an interior installation, I would suggest a mild soap & water sponging of the surface followed by a clean water rinse. In either situation, allow the surface to dry completely before sealing.

Always choose a quality masonry sealer! There are lots on the market and not every sealer is right for each application so make sure you do some research and don't swap quality for cost. A decent sealer should provide years of protection.

Hope that helped and thanks for Asking A Home Improvement Expert!

Sunday, August 5, 2012

New England Style Steak and Chicken: Grilling tips for the Summer

Well Hello!
Boy, It's been a while since I've posted, huh? I know, that may be a good thing. It means we've been overwhelmed with work but you know how much I love you all so I'm here to discuss a VERY serious matter. Something that seems to have been overlooked by almost every other remodeling blog this season so far... BARBECUE TIPS!

Oh, you think I'm kidding?... If you had any idea of how many people are brutalizing perfectly good cuts of chicken and steak as we speak, your laughter would turn to tears.

Thankfully, I've been taking notes and I've had a particularly good grilling season so far.
So, I'm going to go right ahead and share some of my grilling insight with you so that your summer will end with all of your friends asking, "Can I PLEASE get YOUR Barbecue Recipes??"

Here we go... nice and easy....

Get yourself some decent, boneless cuts of either Chicken  (boneless breast) or steak (Sirloin strip). I'm showing Steak tips because we all know what a boneless chicken breast looks like.


Other things you need!

**Study this picture**... Nah, don't. I'm going to list most of the ingredients in the next few paragraphs. I just thought I'd make you pay extra attention. Then again, there are only six things in this picture. Isn't it worth looking?


Is that it? YUP! Those six ingredients (Salt excluded, I'll cover that in a minute) are the backbone to every GREAT marinade. Don't argue, just hear me out and do this in order.

You need to take the portions of meat you've purchased, remove the EXCESS FAT you see and cut them into somewhat equal pieces. Don't shoot for perfect sizes especially with steak, Just try to cut them into somewhat even chunks that you can work with. Bigger pieces will come out more  Medium/Rare when cooked on the grill.... smaller pieces will cook more Medium/Well Done.

Chicken, you can go for a more even size cut of meat (because there is no "medium rare" with chicken. You want your guests to enjoy your barbecue, not be calling you from the hospital letting you know that they survived)

And here comes the marinade recipe: 

  • 1/2 cup Canola oil 
  • 1/4 cup Red Wine Vinegar
  • 1/4 cup water (I love Poland Springs, Use something good)
  • 1/4Teaspoon of Pepper
  • 1/2  Teaspoons of Salt (this is actually a HUGE ingredient but everyone is so scared of salt? I'll leave it up to you to decide how much to use. I've given my input now run with it. You know what you like, let your taste-buds be the judge of how much you need)

You're done.

Wait... what? What do you mean "I'm done?? You have pictures of Oregano and Rosemary! How much of those do I need??"
Those are all just complimentary. Feel free to toss a shake of whatever you like into your particular marinade. I only ask that you taste it before you use it. Yes, I said taste it. It should taste much like a good salad dressing. I often like to add either Honey or Sugar (sweetness does wonders for a marinade!) to give it a little extra love before I saturate a good cut of meat. Meat is your friend, don't subject it to anything you wouldn't be willing to taste.

Like I said, you're done.
That's the basis of your marinade. Wasn't that easy?
Short sidenote: You should be very picky with your meat trimmings. Remove any excess fat your grocer missed when cutting your tips into perfect marinade-ready cubes.

Here's my biggest tip: Go get yourself some Zip-lock freezer bags. Take the meat you've bought and cut it as previously described.

Combine meat and marinade into neat "pillow" grilling bags AND.... You're Done! (Boy, I keep saying 'You're done' and continue to talk... I promise we're close to the end)

Here's what Steak should look like:


And here's Chicken:


Toss those Buggers into your fridge for a good 24 hours before grilling. Allow the meat time to marinate and when you think they are ready,  cook on a hot grill at medium/low temp and flip often until cooked to perfection. Cooking is the second hardest part and I will cover an entirely different post (ain't I a stinker?)
My point here is: DON'T PAY FOR PRE-MARINATED MEATS!  You can and SHOULD do this yourself!

TIP OF THE DAY:  Make sure you "play with your meat" *Giggle*
As the meat pouches sit in your fridge soaking up the goodness, make sure to fondle them often and allow all of the marinade to work it's way through the meat pillows. You know you like it, let your fingers do the walking. Reach in often and fondle them to work the marinade through the meat.

Happy Grilling!

Sunday, June 10, 2012

PAINT COLOR IDEAS: The Pottery Barn Effect


Jennifer H. asked us, "What paint colors work best in small rooms?"

Unfortunately, Jennifer didn't send us any pictures of what room she was trying to paint 
(it must be a secret... shhhh, don't tell anyone she's thinking about painting)
That being the case, I'm going to divulge a few tricks that I use to make almost ANY paint color look better.
I call it, The Pottery Barn Effect.

"But Daniel! I don't even shop at the Pottery Barn!"
Settle down...it's okay, neither do I. What I'm referring to is something I noticed years ago in the way Pottery barn presents its products in its advertising.
Here, let me pull up a few images:

pottery barn paint color ideas


Okay, I'm surrounded by a bunch of 'Pottery Barn-esque' pictures. Keep in mind, not every color shown is a particular favorite of mine but they don't have to be. The images are designed to do one thing,
Make The Furniture Look Good.

The interesting thing I started to notice many years ago is that they use a very specific design style in a lot of their catalogs. Look past the furniture and focus just on the rooms, there are a few elements they tend incorporate in the background to help make their furniture look its best.
Notice any similarities yet? Here's what I noticed:


Most of the rooms that have "The Pottery Barn Effect" usually have flat white ceilings as well.
For some reason, I've chosen not to show any examples of that in these pictures.

I blame  Jennifer H. She started this whole
let's-not-submit-photos thing. I just didn't want her to feel left out.
Do those elements really make THAT much of a difference? Well, you decide. Take a look at the image below.


How many of you have seen or own a living space like this?

dark room trim

I'm sorry but, 1982 called and wants their everything back. Golden oak stain on the stairs, chair rails, baseboards, doors & windows.... don't stare at that picture too long, I think it comes with a Surgeon General's warning.
There is just nothing inviting about those harsh, dark, trim lines breaking up every single visual aspect of the room. It kind of reminds me of my parents old Country Squire station wagon.


Another open living space with "The Pottery Barn Effect"


Doesn't that just make your stomach feel a little better? (I know, you're welcome)
So how do we quickly achieve this effect?

Here are a couple of simple rules to follow when updating a room for paint


TRIM

Replace any existing baseboard, door & window casings with wider trim.


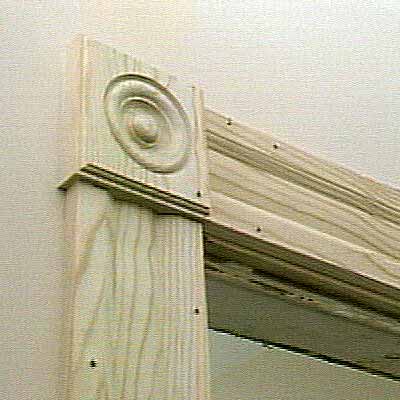
A lot of houses come with a traditional 2 1/2" colonial molding, try stepping it up to a 3 1/2" or maybe a belly-mold with bulls-eyes.
What's a belly mold?

Oops, that's a different type of belly mold


Here it is

They work great with bulls-eye corner blocks for some real extra flair. Also, there are a lot of taller baseboard moldings available. I personally like updating the old colonial baseboard to a 5 1/4" Speed Base.


PAINT

Use semi-gloss white paint for the trim.
When choosing a trim paint, most use either oil or latex (acrylic). Oil paint gives a smoother finish but can sag if applied to heavily. It can take more coats to cover and is harder to clean up as well. Latex paint works well but can show more brush marks as it dries faster. The upside is that it cleans up very easily with water. Either works, pick your poison.
When it comes to wall color, It's all about personal preference but if you frame it in white trim? I guarantee it'll look a lot more like the magazines you probably first saw the color in.

When choosing a wall paint, USE LATEX FLAT ENAMEL.

Paint comes in a lot of different sheens such as:
  • Gloss
  • Semi-gloss 
  • Eggshell
  • Satin
  • Flat 
and the one sheen we can never seem get away from.....


When you're painting interior walls, 99% of the time these walls (much like Charlie Sheen) are NOT going to be perfect. They never are, learn to accept it (Charlie has). Walls are usually built over wooden studs which crown, twist and bend. The seams of most wallboard are hand smoothed with either plaster or joint compound. Even the best plastered wall rarely holds up to a straight-edge.
Here's the problem: Higher gloss paints reflect light and when light hits those newly painted walls?
You guessed it... you see the imperfections.

Walls painted with a FLAT paint aren't nearly as reflective so they do a great job of hiding a lot of those little inconsistencies which will help your walls appear smooth and give your room a cleaner look. The reason I suggest flat ENAMEL is because certain walls tend to get more abuse.
In the past, a lot of painters would use an Eggshell paint in bathrooms & bedrooms. It was more durable and helped protect against the higher humidity you find in bathrooms and also in places where little hand-prints had a tendency to show up on walls.
Enamel paint has a lot of the same durability qualities as an Eggshell but none of it's reflective qualities so you can still scrub it a bit without pulling the paint off of the wall or ruining the finish.

When it comes to paint manufacturers, I was always a Benjamin Moore fan. Sherman Williams was a close second but since Home Depot acquired Behr Paints, they've made a lot of effort to make it a worthy competitor at a reasonable price. I've had great success using the Behr premium interior as well as exterior lines of paint. Their Premium Plus Ultra all-in-one primer & paint makes a lot of tough walls very easy to cover with only a couple of coats, a helpful quality for amateur painters.

Lastly, when it comes to ceilings? I always prefer flat white.
It keeps the room feeling open and airy which is especially helpful in a room with a lower ceiling height. Try to use a decent grade of ceiling paint so that it won't take as many coats to make your roller marks disappear.

LET'S REVIEW!
  1. Wide trim in semi-gloss white
  2. Flat enamel latex walls
  3. Flat white ceilings
Hey, guess what? You've learned the secrets of The Pottery Barn Effect! 
Make sure all of your outlets, receptacles and switch plates are all updated in white as well to tie the room together.

If you don't have any experience replacing outlets or switches, I always suggest you call a professional or Ask A Home Improvement Expert!
Jennifer H., I hope that answered your question and I really hope the ugly room picture I posted wasn't your house. Actually? I hope it was... someone seriously needs to paint that room.

-Cheers!

Sunday, May 20, 2012

FLOOR TILE: Does SIZE matter?

Janice T. sent this question to Ask A Home Improvement Expert:

"We've been thinking about changing the tile in our bathroom but we aren't sure which size tile we should use. Is smaller tile better for a bathroom?"


That's a great question!.... and it's nice to finally have a woman ask a man if size matters.
My personal opinion is that the more grout lines you have, the busier a floor looks. A lot of people grew up looking at their parents bathrooms with tiny mosaic tiles and mauve colored fixtures.
You've seen how your parents used to dress, do you really want to use their sense of style as a point of reference?


{{{shiver}}} Yikes......Anyway, I always start by trying to use the largest tile I can in a given room. The reason I start here as I said, is that more grout lines make a floor look busier and unfortunately
Busier = Smaller. I don't want a small room to feel even smaller, I want it to feel spacious and open. Larger tiles can make a small bathroom feel bigger. There is no rule saying you can't use 18" x 18" tiles in a 50 sq. ft. bathroom. It's all about the look you are trying to create. However! There are a few issues that can potentially sway the choice of tile size that  you should always take into account.

How level are your floors?

Run a level over your floor before you make any decisions to spot the inconsistencies in your floor and to see which way it may be pitching. Smaller tiles have the ability to conform to these inconsistencies. In a perfect world, you'd never want to have a floor with a lot of pitches and rolls but often in homes that are 150-200 years old, the best you can hope for is to minimize the motion of the floor. If you tried to get it back to perfectly level, you'd likely end up with a floor that's much higher in some areas than you want. This is especially troublesome when the doorway transition ends up being over an inch out of level (unless you enjoy watching your friends trip in and out of your bathroom). In these cases, we are try to get the floor to be as FLAT as possible... not as LEVEL.
Larger tiles such as an 18" x 18" are more difficult to lay flat due to the fact that each tile covers so much floor space. If the area you're working is a little higher in the middle of where a tile lands, you may find that corners of your tiles are left sitting up higher than you would like. Sometimes adjusting the layout of where your grout lines will land can help work around some of these problem areas.

Desired Effect

Is there any other tile in your room? If there is a specific tile pattern on your walls or shower, it may dictate how you want to approach your floor. There are common styles that people are trying to recreate or achieve that can help determine the floor tile. For example, A subway wall pattern: We often see a smaller mosaic tile pattern with subway-style tiled walls.


There are no hard and fast rules but, there are applications that you may have seen and are subconsciously trying to recreate.

If you are simply looking to update your floor, I  would suggest picking color before size. It's often more important to get the color you desire and you may find that the color you love? Isn't available in every size and shape. Your question may be answered before you ask it!

Bathroom usage

Is this a bathroom that gets a lot of family use? If it is, I would point out that for every grout line you create is also one you need to maintain. Grout needs to be cleaned and sealed according to usage, sometimes as often as once a year. A full bathroom with 5 family members and a dog that  you can't seem to keep clean no matter how many times you wrap him in plastic, will be subject to more water and soil on the floor than a half-bath connected to a guest room. (I'm kidding, don't wrap your dog in plastic.....kids are optional)
Fewer grout lines can also mean fewer possible areas for moisture to get through to the substrate if those grout lines ever open up over time. Remember: More grout lines = More maintenance.


Grout color

Grout color will affect your choice as well. There are two ways to go with grout color, one that blends or one that pops. Both have their advantages in certain situations but more often I try to find a grout color that blends with the color of the tile itself. This helps keep whatever floor tile I choose feeling like one consistent floor not like a bunch of smaller pieces. I see this mistake a lot, a bad grout color choice making a floor look too broken up. Example:

I also tend to avoid very light grout colors in favor of more neutrals because lighter grout colors are much more difficult to maintain and they discolor quickly. I only use white & off-white grout when it's specific to the effect the customer desires. Which brings me to my last point:

Personal preference

What do you like? I always ask potential customers to pick out a few pictures of bathroom floors that they think are cool. When a customer shows me three pictures of bathrooms all with larger style tiles or perhaps all with a particular pattern, it makes finding their solution simpler. Sometimes I even find they don't like the floors they've shown me at all, they actually like the color, layout or style of a room. It's important that whatever you pick works with the room itself and when in doubt? I would suggest that something simple, clean and neutral often works better than something bold and intricate. It also allows you to update other elements of the room over time without limiting your choices.

So, there are no universal answers but there are certainly considerations in making your choice. Try to ask yourself these questions before you make a decision or Ask A Home Improvement Expert!

As always, I'm Daniel and I'm a General Contractor. (<--- and that's still a link)

-Cheers!

Sunday, May 6, 2012

CAPTCHA: Why Do You Hate Me?

I remember a simpler time when the worst thing about spam was how to get it out of the can. Apparently, it's a much bigger problem now because every time I try to do anything online I get hit with a CAPTCHA. It stands for "Completely Automated Public Turing test to tell Computers and Humans Apart" and it was designed to cut down on SPAM (flooding the internet with copies of the same message). It stops software programs from abusing services and minimizes automated postings to blogs and such. 

You've all seen them. That tiny box of fuzzy words that you have to type in to virtually everything nowadays. It's sole purpose is to prove that you're an actual human being to complete your submission. Wonderful.

Here's my problem:

I'M HUMAN AND I CAN'T TELL WHAT THOSE WORDS ARE!


Let me give you a window into the hell that is my life. Just this morning, I was downloading a picture to use for an article and I was hit with this CAPTCHA:

CAPTCHA
Okay, this is no problem. It looks like "i" then.... wait, is that an "o"? I think it is. What if it isn't? I don't want to get this wrong and have to retype my information. 
Hang on, they have a little recycle button just to the right of the submission box. Let me hit that and get new words:

Huh? Why are those numbers are upside down? Do I type them in that order or am I supposed to flip them and type them in the other way? Hang on, let me get a new one:


Whoa! What's that inkblot on the right? How do I.... is that....... am I supposed to type that? Im really confused, this is starting to feel like a Rorschach Test. 
Wait, there is a little speaker button there! Will that let me HEAR what I'm supposed to type? That's perfect! Let me hit that button....


 *SATANIC-BACKWARDS-MASKING-EVIL-IS-UPON-US-I-HEAR-DEAD-PEOPLE!!!*


OH MY GOD!!............... That was a HUGE mistake!!............................Let's just stick to the letters! 

*hitting the recycle button again*
 

Come On!! I don't even know what language that second part is! Do I even have a key on my keyboard for that?? NEXT!


ARE YOU SERIOUS RIGHT NOW?? What the HELL is that?! That's not even a word, its a PICTURE!! Is that a building?? Do I type in "building"?? Why is it so out of focus and why are they showing me pictures?! NEXT!!

STOP!! I can read it!! YES! Oh dear Lord thank you.... Thank you!.... Stay right there, let me just type that in, 'passage toniets'.....

"Incorrect security code entered, please try again"


Wait, what?? Oh God no... I typed it in wrong! I had the perfect CAPTCHA and I blew it! I BLEW IT!! Please, please, please.... I'm begging you, give me another easy one. I won't ever talk bad about CAPTCHA again if you just give me one more easy one..... pretty please......

*Hitting recycle with my eyes shut*


........... I so hate you right now......................


Daniel Batal is a Remodeling Contractor and owner at Focalpoint Renovations


My Zimbio
Image: David Castillo Dominici / FreeDigitalPhotos.net

Wednesday, May 2, 2012

7 Amazing Gadgets You Must Have!

What does a Contractor do on a very rainy Wednesday morning? He surfs the internet and finds the coolest stuff ever and shares it with you! May I present my Top 7 in no particular order (I thought five wasn't enough and ten was just plain excessive...)

The Jellyfish Aquarium


Forget the shark tank, here's a 7 gallon acrylic tank that comes with it's own built in lighting and filtration system from Jelly Fish Art.  The entry level package with one moon jellyfish and a 3 month supply of food starts at $382.00, but if your wallet is feeling particularly fat, you can opt for the $709.00 deluxe package. 
Deluxe package Includes:
  •     Desktop Jellyfish Tank
  •     3× Large Moon Jellyfish
  •     12 Month Food Supply
  •     2× Red Leg Hermit Crab
  •     2× Cleaner Snail
  •     Algae Cleaner Magnet
  •     Water Quality Test Kit
  •     Aquarium Salt (10 Gal)
  •     Water Heater
  •     Floating Thermometer
  •     Nutrafin Cycle 1oz
  •     Clear Vacuum Hose
  •     Substrate
No mention of having a second person to pee on you in case you get stung.... It would be worth having just to say to people, "I have to get home to feed my jellyfish" and watch the expressions on their faces. In fact, you could capture those expressions with this...

iPhone Tri-lens


If you're an aspiring photographer or just want to make your iPhone look like it's having its eyes checked.... this quirky little device from Photojojo might rank high on your list of 'must-haves'. The iPhone lens dial spins to offer three optical-quality coated glass lenses: Telephoto, Wide Angle and Fish-eye. The aluminum housing also comes equipped with a tripod mount for landscape and portrait shots. Priced at $249.00 (that's only $83/lens if you're trying to justify buying one) Or maybe you prefer something a little more silly...


BANG! (Shoot the light out)


My girlfriend spotted this one from Bitplay. It's as simple as it looks. This desk lamp comes with a gun shaped remote that you "shoot" the light on and off with. When the lamp is shot to OFF, the lampshade tilts to the side in its "wounded" position.... The shade stands back up and the light comes on when in reverse. All this fun can be yours for a mere $336.00. Okay, maybe that one was too silly. Maybe you prefer something more suited to your sophisticated tastes. How about this inconspicuous device:

Nest Thermostat


"Daniel, what's so cool about a thermostat?" Well, nothing usually but this Nest Thermostat only needs you to adjust two settings: Up & Down. Over the course of about a week, it creates a program based on the temperature changes you've made. It continuously adapts to your adjustments and offers information such as how long it will actually take before you room comes up to the desired temperature. It also signals energy saving actions with its 'Nest Leaf' logo whenever you perform them. Much like the Terminator, this is a learning machine, but this machine will cost you $249.00. Speaking of the Terminator, let's replicate something...

MakerBot 3D Replicator


Tired of two dimensional printing? Why not make your prints come to life with The MakerBot Replicator™,  the ultimate personal 3D printer. MakerBot gives you the ability to extrude your design in single or dual-color ABS plastic with a build space equal to the size of a loaf of bread. The best part about this device is the list of warnings it comes with on the website. I haven't seen such a potentially dangerous device since the Flux Capacitor or...... the Easy-Bake Oven. Just imagine what trouble you could cause for only $1,749.00. What, do you think dangerously cool gadgets are all too expensive? Well then, take a gander at this...

Evergreen Mp3 Player


Haven't we seen enough mp3 players? Yup, but the "DN-2000" from Evergreen can attach to your keychain and plays music directly from SD-memory cards (1GB max) for up to 5 hours on a single AAA battery. Those stats may not be very impressive, but this one is... The price: $8.50. It's the closest I've seen to a disposable digital music player. I'm sorry, are you too old-school for digital music? Maybe this next one is more your speed....


Soundwagon Portable Mini Record Player


The name says it all. Tired of watching your vinyl spin? Why not give them a break and let the Soundwagon do it for a change. This officially licensed VW minibus model is a fully-functional, battery powered phonograph player. It's contains a needle, amplifier and speaker that will run laps around your LP's... that's if your brave enough to turn your precious collection into a race track. $99.00 puts you behind the wheel of this micro-magic......

So, there are my top 7. I'm always on the look out for anything cool and unusual so please, feel free to drop a comment or link below if you've got something unique or kooky that we should all know about... like a machine to make it stop raining.

Cheers!


Monday, April 30, 2012

Bathroom Toilet Repair: The Smell from Hell


I received a question from Samuel C. asking: "I have a constant smell in my bathroom I can't seem to find or fix. Any suggestions?"

Yes.... Flush when you're done.

No, I'm kidding Sam.
What you are most likely smelling are sewer gasses. All of the drains in your bathroom lead to a central drain that takes waste-water out of your house to either a city sewer line or a leach field depending on where you live. Those drain lines can contain sewer gasses such as Methane, hydrogen sulfide, ammonia, sulfur dioxide and more.

The way we stop those gasses from coming back into your house is by means of a "trap". What's a trap? 
A trap is when a woman asks you if an outfit makes her look heavy..... It's also a U-shaped bend in the drain line that "traps" water creating a barrier between you and the open sewer system.

The Usual Suspects:

In a full bathroom there are typically three traps:
  1. One under the sink (which is often located in the vanity cabinet)
  2. One under the tub/shower (which is usually hidden in the floor)
  3. One in the toilet (This one is actually built into the toilet itself)

One or more of these could be causing that smell. Typically, if a sink trap is faulty, you will see signs of water damage below the trap suggesting it's not holding water as it should. That would show up in the vanity cabinet floor. For the tub/shower it can be trickier as the trap is enclosed and may show signs of leaking in the ceiling below if it's a second floor bathroom.

All of that being said, the first place I always check and the most likely candidate is the toilet and let me explain why. 
As I mentioned, the toilet has a built-in trap. This trap allows the toilet to maintain the water level inside the bowl. If there was no trap, the water would just flow down the drain and the toilet bowl would be empty and dry. When a toilet is installed, it's placed onto a floor drain using a wax ring gasket.


The wax ring is used to seal the drain outlet on the bottom of the toilet to the drain opening in the floor. When a toilet is installed, the ring is placed onto the drain... the toilet is dropped onto the ring... and the toilet bolts (also known as closet bolts) are tightened enough to lock the toilet in place. If that wax gasket ring starts to fail or isn't seated properly? Sewer gasses can sneak out from under your toilet causing your bathroom to have that suspicious smell. It can also cause water to escape, sometimes invisibly, with each flush potentially damaging the floor hidden under the toilet.

How To Repair A Toilet Gasket: 

1) Turn off the water supply to your toilet

2) Flush the toilet and hold the handle down to drain as much water from the tank & bowl as possible

3) Disconnect the water supply line

4) Disconnect the two closet bolts holding the toilet to the floor

5) Lift the toilet straight up and off and place it to the side. Try to lay either old towels or a drop-cloth underneath as the wax ring can be stuck to the underside and make a mess of whatever it touches. Also, It's hard to get all of the water out of the toilet without pumping it and any tilting will cause it to spill out from underneath. 

6) You'll now see the drain flange on the floor. Scrape any excess wax off of the flange to prepare it for a new wax ring.
I suggest buying a jumbo ring with a built-in flange to get the best seal. They often come with new closet bolts in case your old ones are junk.

7) Be sure to inspect and clean the bottom outlet of the toilet to remove any excess wax that may be stuck to the toilet. BE CAREFUL! As I mentioned, when you tip the toilet excess water WILL spill out. I like to take the toilet into the tub or shower for this maneuver if possible. Also, the wax that the rings are made out of can make a mess of anything it comes in contact with. Do your best not to get it on you, your floors, your dog.... your children.

8) Set the new wax gasket in place on the floor, position the closet bolts so they are straight up and ready for the toilet. 

9) Drop the toilet in place making sure the bolts slide up through both holes in the base of the toilet and press down. You should feel the toilet raised from the floor as you press it down a bit into place till the base touches the floor. That's the wax gasket ring getting squished down and creating the seal you need. If the toilet hits the floor with a clunk, the gap between the drain flange and toilet outlet may have been to big for the wax ring to seal. You may need to stack a secondary standard wax ring on top to create a seal (this isn't ideal, I'd rather have a new toilet flange installed at the proper height but, it's not uncommon).

10) Tighten down the closet bolts making sure NOT to use too much torque. You aren't installing tires on a race car here so, take it easy Mr. Goodwrench. You just want to hold the toilet in place, not crack the porcelain base of the toilet or damage the drain flange.

11) Reconnect the water supply, turn on the water and let the tank fill back up.

12) Flush a few times to make sure things are sealed and no water is leaking out and voila.... you've successfully re-installed your toilet with a proper seal.

Sometimes there can be complications of broken toilet flanges, closet bolts or rotted sub-flooring. If you find any of that in your situation, it will need to be repaired before reinstalling the toilet.
Best of luck and if you have any other questions, be sure to Ask A Home Improvement Expert!

Cheers!


Image: Marco Torresin / FreeDigitalPhotos.net

Thursday, April 26, 2012

ASK A HOME IMPROVEMENT EXPERT!

We've added a new feature to our website, "Ask a Home Improvement Expert".
It's designed to allow any of you with a DIY (Do It Yourself) question to submit it to Focalpoint Renovations along with your name and email address.

We will respond to all questions within 48 hours and do our best to answer every question you might have about how to do something or more importantly, how NOT to do something!

Drop us a line and see if we can answer something for you!
The best questions and answers will be posted here on our blog so that others may read them as well.

Cheers!

Tuesday, April 24, 2012

Home Improvement Stores: Are They Really An Improvement?

     I was in Lowe's the other day looking at pre-finished flooring trying to compare their off-the-shelf products to another company that I like to use, Lumber Liquidators.  I was checking out the open boxes and inspecting the individual pieces, trying to eyeball how clean, straight and consistent they were so I could approximate the actual waste expected per box, then it hit me.... What the hell am I doing?
I mean that in the nicest and broadest senses of the words but seriously, what the hell was I doing?
I know so many hardwood flooring suppliers, why am I here doing renovation recon?
Was I getting paid to investigate these materials? No.
Do I gain anything from this process? No, well ...Yes. I gain the advantage of knowing what products are available to my customers and at what price.
Does this knowledge make me more money? This is where it gets tricky...

     There was a time, not so long ago, when their wasn't such a thing as a Home Depot or a Lowe's. There were local supply houses that contractors would order their materials from. The thought of a homeowner coming to a supply house to investigate pricing on flooring, or furnaces, or roofing materials wasn't unheard of... but it certainly wasn't a common strategy. As a matter of fact, most supply houses used to offer slightly reduced contractor pricing to try and cover the costs of estimating, ordering and delivery that contractors have to do on a daily basis and give contractors some room to breathe just in case an overzealous homeowner came in looking to beat down a builder.

     Now things are differen't. A homeowner can walk into a Home Improvement center and casually stroll through the aisles, gaining vast amounts of information about the prices of available materials for their homes. They can even casually glance at the bannered pricing campaigns that say things like, "Whole house carpet installation for only $37.00!" (I bet you think I made that up, I thought you might. Here's the ad from 2 seconds ago): 


Let me stop here.
Does anyone really believe that an entire house can be carpeted for thirty-seven dollars? I mean, seriously... even if only two guys show up to do the install and they only get paid $10.00/hour and somehow manage to carpet and clean up your whole house in an 8 hour day.... that's still $10 x 8(hrs) x 2(guys)= $160.00.... and that doesn't cover any of the delivery or fuel expenses. This math isn't adding up.
First of all, there must be a tremendous mark-up on the carpet you're buying for them to be able to offer this service.
Second of all, catch words like "Basic Installation" usually mean things like
  • You want us to take the old carpet out? That's extra
  • You want us to dispose of the old carpet? That's extra
  • You wan't the old, moldy & stained padding removed from under your carpet? That's extra
  • You want new padding installed? That's extra
  • You have stairs you want carpeted in your house? That's extra
  • You wan't us to walk up those stairs to carpet your second floor? That's extra
Basically speaking, nobody ever qualifies for "Basic installation"...

What's difficult for contractors is that most homeowners never get to that stage of questioning. They see a sign that says "Whole house carpet installation for only $37.00" and often call a contractor saying... "I've found the carpet I like and know the price I can buy it for. Can YOU carpet my whole house for $37.00?"        The answer, of course, is No.

Let me come right out and say this: No professional can carpet an entire house for $37.00.

     I don't care if your house is 15 feet long x 15 feet wide, one room, no kitchen, just a bed on the floor with a hot-plate, a bag of stale Cheetos and a sleeping bag....  It'll cost more than $37.00 to have someone install your flooring. I say this so that homeowners can have a more realistic expectation of what a good contractor will cost. 
     As a matter of fact, I'll drop this little tid-bit of advice out there to chew on... in most cases, expect to pay at least as much for labor as you do materials. Sound crazy? Let me blow this by you: If you find an Andersen Frenchwood patio door for $1,000.00 that you'd like to use to replace the sliding glass door that's falling off of your house? Expect to pay at least that much in labor to remove the old one, prep the opening, install the new door and remove all debris.
If you find a good deal on pre-finished 2 1/4" maple flooring at only $3.25/square foot? Expect to pay all of that per square foot in installation costs and even more if there is a floor that needs to be removed before this new-lovely can be installed.

     This is the real world, and sometimes I think people just love the idea of a great deal. They have learned NOT to believe the car commercial that says, "You can be driving this car for only $37.00 a week!" because many of us have figured out that you have to put a significant amount of money down... then qualify for a very specific set of credit terms... then opt to buy a very specific vehicle that often isn't available once you've jumped through the first two hoops bringing that $37.00/week purchase right back to a more common $385/month car payment.

     Which brings me all the way back to Lowe's, staring at flooring, wondering if this is the right product for my customer...
Why am I doing this? Because I want to have the most informed answers for my customers.
Does this pay off? It does when my company is hired to do a job because we know more about what's available and have advice on product lines.
Has the advent of warehouse home improvement companies made contracting more difficult? INFINITELY!
     Does all of this knowledge make me more money? I think you have to be able to defend your estimate prices against all competition. You have to be able to explain to a potential customer that perhaps your "more expensive" estimate covers things that would be an "extra" on another companies estimate. Sometimes, it's better to know how everyone else is doing business for no other reason than to feel confident about doing business your way.

As always, I'm Daniel and I don't model..... I REMODEL! <--- (you're just dying to click it.... go ahead, nobody's looking... I dare you.)

Cheers!

Friday, April 20, 2012

Google Over-Optimization Penalty. WE'RE ALL GONNA DIE!!!

Google's over optimization penalty drives  people crazy
I just wanted to take a second to mention something that Google has been dangling out there and that everyone of us who owns a website should be aware of.
It's called the Website Over-Optimization Penalty. Let met start by quoting my hero, SEO guru/Google mouthpiece Matt Cutts:

"What about the people optimizing really hard and doing a lot of SEO. We don’t normally pre-announce changes but there is something we are working in the last few months and hope to release it in the next months or few weeks. We are trying to level the playing field a bit. All those people doing, for lack of a better word, over optimization or overly SEO – versus those making great content and great site. We are trying to make GoogleBot smarter, make our relevance better, and we are also looking for those who abuse it, like too many keywords on a page, or exchange way too many links or go well beyond what you normally expect. We have several engineers on my team working on this right now.”

The reason I blog about these things is so that small business owners can talk candidly and open about what works and what doesn't work in terms of getting our sites to show up better in search results. I've hinted quite a few times that keywords may begin to slowly lose out to "fresh content"  if Google has its way.

Some people are calling this 'THE DEATH OF SEO' which, quite frankly, makes me laugh. 

I equate that to mp3's being the DEATH OF MUSIC.  

No they weren't.
It was yet another landmark in the rethinking how music could be presented much like compact discs were when they came onto the market. Did mp3's hurt the established music industry? Yeah.... they did. They released the strangle-hold labels had on how music was presented. Did it put a knife in the back of the compact disc? Yeah, sorry.... I took that same walk of shame as  some of you, putting most of them away after transferring them onto my computer and wondering how much money I had spent on vinyl, cassettes, cd's only to have them all end up on this new invisible file called an mp3... but, is music dead?.................................... Come on.

Even the worst surfer would probably tell you that you need to stay ahead of the wave if you want to keep on your feet. If you're going cry every time the tides change, you might want to find a different way to spend your time.

This whole algorithmic change? It's all just something new that we need to factor into how we present our companies.  I've read more guesses as to what the correct density of keywords should be (2-4%? or is it 5%?) or how we shouldn't be too repetitive in our URL's, titles and descriptions as not to sound like we're keyword stuffing...

Let me toss this crazy notion out there: Google wants things to be more natural? Here's my advice: Stay natural!

Still use SEO? HELL, YEAH
But make sure you put the "O" in "Search Engine Optimization".  Make sure your browser titles are unique to each page. Make sure they make sense... you know who I'm talking to.... THINK ABOUT (yes I said it) if your content and design seems natural!

If your website is ThingsInMySink.com? (which was available when I wrote this blog so if you secure that name, I'll be coming after you once you've made your first million)... Then you should be looking to write about things such as "Steak knives, dirty dishes, soap scum, bits of food in the strainer, mildew around the faucet, and oh my god where is my wedding ring??"... and so on.
If you decide to approach this site with "Things in my sink, Sink, Kitchen Sink, Sink things, My Sink, Sink Kitchen, things sink,...." and worst of all "In-sink" (Sorry Justin Timberlake)... then you may be setting yourself up for a Google over-optimization penalty. I refuse to accept that the fact that thinking about NOT over-optimizing is anything less than full-blown SEO at its finest! Google isn't asking you to stop being a salesman, they are asking you to be a better salesman or at least a different type of salesman than some of us have become used to being.
Stay smart, stay sharp, and stay in the game. I'll be in the car listening to my compact discs while I can still buy them....or a car stereo that will play them..... or a car for that matter.

So, for now... I'm Daniel and I'm a General Contractor. <-- (and yes that's a link.)

Cheers!


Image: David Castillo Dominici / FreeDigitalPhotos.net

Tuesday, April 10, 2012

Kitchen Remodeling Design and Ideas

 "What is the focal point of a kitchen"? Those were the search terms our website was viewed under recently and it was an extremely interesting question so I thought I'd take a second to address it.

Every kitchen is unique as well as every customer but, often times we find certain similarities that help us focus the direction a kitchen might take. Here are a few things to consider while thinking about a new kitchen design.

  1. Kitchen sink location: Why is this important? With many kitchens, the sink is often located directly under a kitchen window. This is an extremely common element and one of the first things we take into consideration when talking to customers about new kitchen designs. It's the first decision a homeowner should think about, where they want the sink. That tells us where we will be placing our new sink base cabinet. If it is to be centered on that window, it allows us to have a starting point to begin building our new kitchen cabinet design around.
  2. Dishwasher location: Typically, you will find your dishwasher located in close proximity to your sink. Why? Because your sink base cabinet offers both a water supply and drain location. We need both of these for our dishwasher to operate which is why you will often see a dishwasher located to the immediate right or left of a sink. It also makes a lot of sense in terms of location because often the homeowner will be rinsing off dishes and stacking them right into the dishwasher.
  3. Range/Cook top location: I am referring to the cook top or range... not the oven. Many times, these are one unit but quite often we install separate wall ovens (often double ovens). An oven unit tends to be used by setting a temperature, inserting whatever is being cooked and basically leaving it alone until it either needs to be checked on or removed. Cook tops are a different beast, we tend to find that there are usually saucepans and pots coming on and off of a cook top many times during the preparation of a meal. Therefor, we like to position a cook top in close proximity to the sink and dishwasher if possible.
  4. Refrigerator Location: This tends to be the last major piece of the puzzle. We always want it close enough that food can be grabbed quickly during the cooking process but, we also want it in a place that family members can access it for a quick drink or snack while another family member might be preparing a meal. It also helps to be positioned in such a way that when groceries are being brought into the home from a vehicle, grocery bags can be placed onto a nearby counter top before being stored away. (We all do this. You know you've done it.... carrying in multiple plastic bags of groceries from the car like it's a carnival game, seeing how many you can loop onto each finger before it gets too heavy to carry or before your hand gets ripped off... My personal best is 9. Feel free to post your best in the comments section below!)

So, what does this have to do with deciding the focal point of a kitchen? Well, if you know WHERE you are going to put the main parts of your kitchen... it becomes a lot easier to place the rest. That being said, these locations begin to tell you what the focal point of your kitchen is instead of you having to decide that and then somehow making everything else magically happen.

Here is a design we've been working on with one of our customers:


As you can see, the sink is centered under the kitchen window. We wanted to place the dishwasher to the right and the cook top along the turn of the cabinet line. We didn't want a continuous line of wall cabinets on either side. It just felt boring and predictable. What we are working towards is accenting the cabinetry. To the left of the sink, we are thinking about taller, glass door cabinets.... and to the right, a raised hood structure above the cook top.
Much of this will be tweaked as this is a work in progress, but you can see simple ways of creating multiple focal points within the cabinet lines of a kitchen using the fixed elements we mentioned as anchors to our design.

In case you were wondering where the fridge and oven are.....


You can also see the microwave has been installed into a base cabinet in the center island. It's another element that is often important to the layout of the kitchen. Some people use them frequently, other use them just to heat up left-overs and make tea.
The one great thing about modern microwave ovens is that they can be mounted into the upper cabinet lines above the cook tops with incorporated ventilation systems which can take the place of a "hood" for a standard cooktop.  If you are looking to install a 6 burner, LP Viking range.... this won't cut the mustard but for a standard four burner range it can be a great way to reduce cook top ventilation costs.

When it comes to an individual kitchen project, many of these variables will change. Bigger budget kitchens can have sinks in the island, downdraft or center hood cook surfaces, multiple wall ovens and more.
If you are talking about a kitchen design that is LESS than the average cost of a European sedan, then those locations will be the first steps in determining the 'Focal point' of your new kitchen.

Cheers!

*content & images property of http://www.focalpointrenovations.com

Wednesday, April 4, 2012

Twist & Grout!... Floor tile 101

How To Grout A Floor


Let's talk about GROUT!
(Please, no throwing of panties at your monitor. I know this is exciting stuff...)

So what does it take to grout a floor? 

Well, this is actually a fairly simple answer: 
A bucket of clean water, an over-sized commercial grade sponge and a FLOAT
What's a float? 
(Dairy Queen would tell you different)  but it's a rubber based trowel that allows you to squeeze grout into the open spaces between each tile while squeegeeing off the excess.

Let me break this down fast and hard: Put 2 minutes on the clock....

1) Make sure your tile has set for at least 24 hours

2) Make sure there is no excess thinset mortar that might pop through the grout lines

3) Make sure all of the grout lines have been cleaned and vacuumed to remove debris

4) Mix your grout to a proper consistency

I'm going to stop here. Nobody ever gives a great description of the proper consistency of a grout mix. Here's mine.. You want it to be thick enough that when you swirl your trowel through it? It stays in that last shape after you pull your trowel out of the bucket. It shouldn't slump or sag back into level.
BUT!!.. It shouldn't be so thick as to be dry and/or pastey. You want it right in that sweet spot between soft and firm. I would describe it as halfway between cake batter and peanut butter.  You may need to add water to it as you work the floor because there is a thing called "slaking" that all mortars and grouts do. Basically, they firm up in the minutes right after the initial mix and you need to remix them (sometimes adding a few drops more water) after a short period of "slaking" <--- Use that word with your friends and they'll think you made it up.

5) FLOAT (not trowel) your grout out along the surface of the floor holding the float on a slight angle as to use it's edge.

This sounds technical? But just throw a good size blob in the area you are working and begin to "FLOAT"... you with me?... Float that grout across a small workable area.

6) Remove the excess grout by floating in a wide, sweeping motion trying to keep your Float perpendicular to the grout lines

What you want to do is use your float in your hand like a giant windshield wiper. Make long swooping passes with your arm extended working the area farthest from your position back TOWARDS your position. Make sure not to dig out any grout with the float as you pass over the floor. You should be just filling them in.
Look, I can't grout and take a snapshot at the same time but... stare at this and you'll get the idea of what I'm saying:
Picture of random dude doing some grouting

Look at the picture. See how he's holding the Float on its edge? See how its squishing the grout into the grout lines while pulling off the excess? See how he has a small pile of grout in front of him ready to fill more grout lines?.... Yeah, DO THAT. Just promise me you won't wear the silly sweatbands that this knucklehead is wearing. I must have found the only image ever captured of Björn Borg grouting a floor. 

Where was I? .... oh, yeah 


7) Using your sponge and clean water, work the area you have just grouted to clean and form the grout lines.

This is the easiest part but SOOO many people get this wrong. Don't wait, you don't need to let the grout 'set'.... trust me, more people end up fighting with clean up because they thought they needed to grout, wait, then clean. Just go ahead and work an area... maybe a few feet wide. When you've floated the grout lines, removed the excess, then use your sponge and water to work the area in the same manner much like removing a paint spill from floor. Wring out that sponge, it shouldn't be dripping... and don't be afraid to change the water along the way, clean water is key. You're going to end up with a product that looks completely clean while it's wet but, dries to a soft and easily removable haze when it dries.
The "haze" always messes people up. It should be little more than a dusting that comes off by wiping your hand across the surface. Much like dust on a mantle. Any more than that?... You didn't clean well enough during the sponge process.

Lastly, (which probably should have been "firstly"?)... There are many types of grout (Standard, Epoxy, Modified, etc). In most situations you will be dealing with standard grout in one of two forms: Sanded and Unsanded.

-SANDED is exactly what it says. There is a sand additive to give it strength for larger grout lines (usually bigger than 1/8"). This is typically the grout that you will use for a floor tiles.

-UNSANDED (take a guess where that name came from). There is no sand added and this mixes up more like a thick pudding. It's used for most wall tile applications or areas where the grout lines are 1/8" or less.

That'll head you in the right direction. Most of this is actually getting used to having a float in your hand and learning the right angle that works for you. You can't talk someone how to ride a bike....they have to do it to get the feel of what you're saying so... go cop a feel.

Okay! I think I've successfully filled my innuendo quota. Never be afraid to drop us a line if you have any DIY project questions at Ask A Home Improvement Expert!

Cheers!


Image: sixninepixels / FreeDigitalPhotos.net