Listen, before you tea-light-lovin' lunatics get on my case... tiny open flames as a form a light or heat ranks right up there with the bicycle as a form of high-speed transportation. Don't get me wrong, just because I don't like those little candles doesn't mean I don't like some of the interesting candle holders they make for them. There are some pretty cool tea light fixtures that I've come across that I think have potential to make for interesting lighting fixture projects.
Here are a couple that I found.
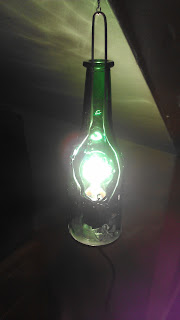
These are some glass bottle housings with the bottoms cut out and a metal base sleeved up through, ready for candles and hanging.
This one was even cooler. It has an old-school, handheld lantern feel that reminds me of Ichabod Crane. Don't ask me why handheld lanterns remind me of him, but in my opinion, guys getting chased by headless horsemen and handheld lanterns should never exist without the other when telling that story. I'm pretty sure that's some kind of literary law.
Anyway, first thing I did was to purchase a few replacement bulb sockets and cheap extension cords.
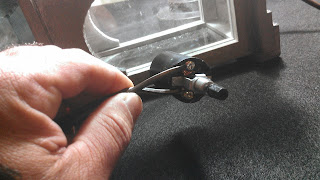
Each ran about $2.50 a piece at my local Home Depot. I cut the female ends off of the cords and stripped the wires back turning them into instant replacement lamp cords which could readily attach to the bulb socket.
The next step was merely to drill a couple 3/8" holes through the bottoms of these tea light fixtures. Hole size may vary depending on the bulb socket you purchase. Drill one in the center for the bulb socket to mount through and offset a second hole to slide the cord into. Slide the cord through the offset drilled hole and you are ready to attach to the bulb socket.
When you're wiring a 2 prong plug, the smaller prong of the actual plug is the hot and the larger prong is the Neutral. These fixtures usually have no ground. If you look at the cord, the two sides of the split wire itself are usually differentiated by something as simple as one half being smooth and one having lined ridges that run the length of the wire. This makes it easy to follow the hot or neutral side back to the stripped end that you will connect to the bulb socket.
The sockets I used have two screws, one brass colored and one silver colored. The brass connection screw is your hot. The silver is your neutral.
These bulb sockets come with a threaded end and a lock-nut to make installation a breeze. Pull the nut off, pop it down through your center drilled hole and reconnect the nut on the bottom to lock it in place from underneath.
The last step to use a little 100% silicone to seal the wiring into the drilled holes and protect the wires from chaffing, then just add the bulb of your choice. I tried to find some interesting ones for a more dramatic effect. Also, the bulb sockets I chose are switchable from the bottom so that they can be turned on and off from underneath once they are hanging in place.
So there you have it. Some very simple yet unique plug-in lanterns that are ready to hang.
See? Only a few innocent tea lights were ignored during this process. I'm sure they've found a wonderful new home at a baby shower or heating up fondue at a party you'd rather not be at anyway.


